- Welcome to ST-Riders - The liST.

The Original ST1100/ST1300 Forum
News:
Welcome to the liST! Before Posting, READ the liST rules stickie post Here! This is a private, STOC-members-only forum. Your real name and STOC# must appear in all posts. Failure to comply with these rules may result in your profile being changed, your account being suspended and/or your posts being removed.
Recent posts
#41
ST1100 Archive of Wisdom / Re: (Stickie) AOW article pict...
Last post by Tom Melnik - January 08, 2013, 09:39:30 AMUpdate:
I have tagged each AOW article with a single * at the end of the title for the articles that I have successfully recovered the pictures or did not have any attached pictures.
Any article tagged with double **, means there are still missing pictures from other sources, other than Webshots.
I have tagged each AOW article with a single * at the end of the title for the articles that I have successfully recovered the pictures or did not have any attached pictures.
Any article tagged with double **, means there are still missing pictures from other sources, other than Webshots.
#42
ST1100 Archive of Wisdom / Zumo 550 Crazy Screen Repair -...
Last post by KoTAOW - December 11, 2012, 08:22:06 PM* * * Article pending permission by Author * * *
Submitted by Dennis aka pretbek, STOC #XXXX
Original article can be found here:
http://www.st-owners.com/forums/showthread.php?83056-Zumo-550-crazy-screen-25-repair-%28w-photos%29
~~~
Zumo 550 Crazy Screen Repair - ( ST1100\ST1300 )
The Zumo 550 GPS seems to have a tendency to have their digitizer go haywire, crazy and bonkers after a few years.
Signs of this are that there seem to be all kinds of phantom screen presses when you don't touch the screen, or it does not react when you do touch the screen (probably because there is a constant phantom screen press occupying the digitizer).
Solution 1: Give Garmin $150 to send you a refurbished Zumo.
Solution 2: Spend $25 on a digitizer from eBay and do it yourself. How-to is shown below.
I bought a Zumo 550 digitizer on eBay for $17 plus shipping. They also sell screens for about $50, you do NOT need that.
I also had to buy a Torx allen wrench ($5 for a pack of four different sizes, including the one I needed) that would be long enough to reach the recessed screws on the back of the Zumo. The Torx inserts that you snap into a screwdriver-style handle are not long enough.
In total I spent about $25.
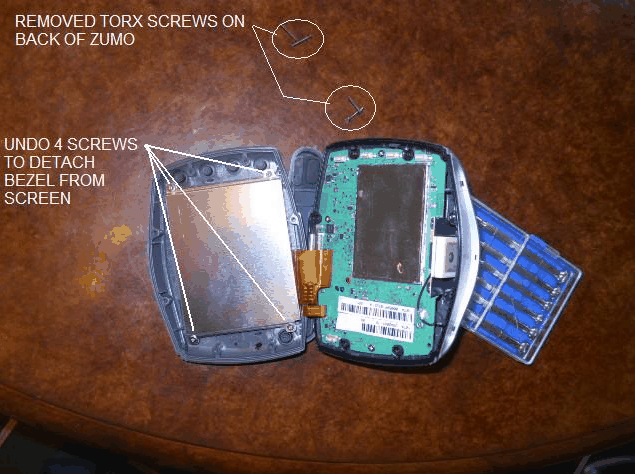
For safety you could remove the battery, which I did.
Then undo all the torx screws in the back of the Zumo and pop the plastic cap off the top.
After that open it carefully, because the front and back half remain joined by the plastic connection leads of the digitizer and the screen to the PC board.
There is a rubber gasket clamped between the front bezel and the digitizer, It is probably a bit stuck to the digitizer by now, but it is not glued. Carefully take it off and clean it, it is probably dirty.
Undo the 4 phillips head screws that hold the metal screen casing to the front bezel.
Pop the screen/digitizer combo out of its metal casing.
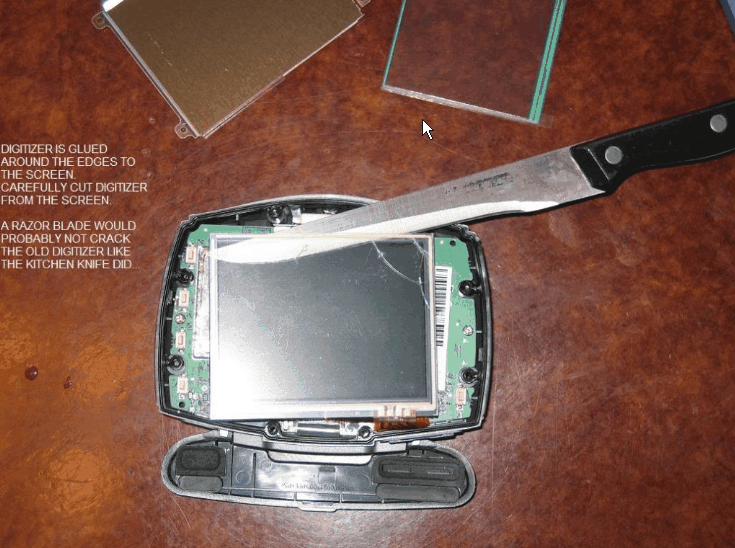
Carefully pull the narrow (1/8" wide) brown plastic contact lead out of its "socket". The wide lead (1" wide) is of the screen, leave that in.
The digitizer is glued to the screen along the perimeter. Cut it loose with a slim, sharp knife like a razor blade. Or a kitchen knife.
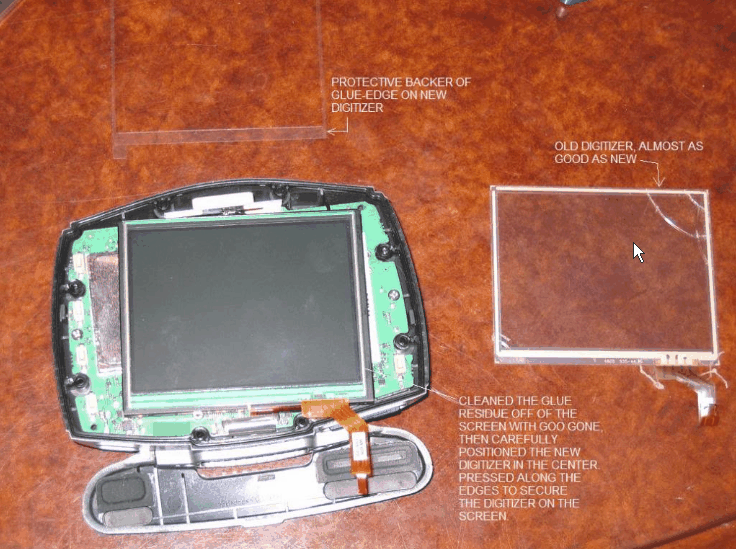
After cleaning the glue residue off of the screen with something like Goo Gone, you can put the new digitizer on the screen.
The digitizer comes with a glue line along the perimeter and a protective backer on it.
Center the digitizer on the screen, make sure the contact lead is in the bottom right corner, then have the glue make contact.
Press along the perimeter to firmly adhere the digitizer to the screen.
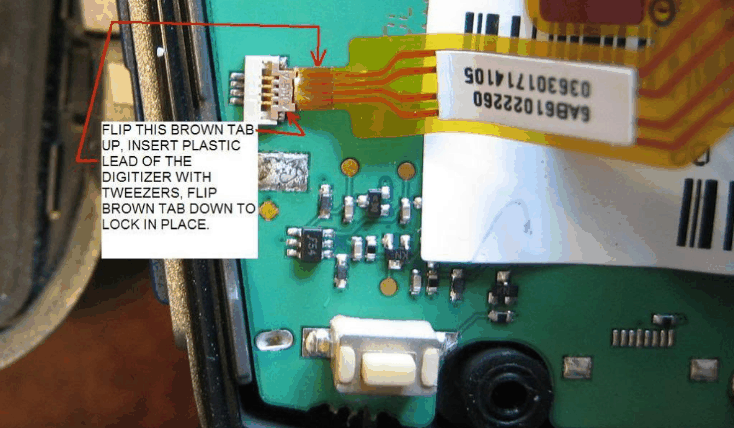
To put the contact lead back in its socket, flip the brown tab up, then slide the lead in the slot and lock the brown tab down again.
Turn the Zumo on and try it out, it should work fine and dandy now.
Now turn it off again, reassemble and go ride!
~~~
Thank You again for your contribution Dennis, aka pretbek, STOC #XXXX
#43
ST1300 Archive of Wisdom / (Stickie) AOW article pictures...
Last post by KoTAOW - December 03, 2012, 04:02:34 PMThere are a lot of articles in the AOW section that contain pictures that have been previously uploaded to Webshots. Over the years, it made sense to upload them to Webshots vs. st-riders.net.
Unfortunately, Webshots has been bought out by another company who is currently moving everything to another server.
Before the Webshot pictures were moved, they were downloaded and will eventually be uploaded to the st-riders.net server for safe keeping.
In the mean time, this means that some of the AOW articles will lose their attached pictures, until the KOTAOW can edit the articles and reference the correct links back to the pictures.
This is a Winter 2012-2013 project. There are currently 178 ST1100 articles and 109 ST1300 articles. This requires a lot of work.
Please be patient the next several months, while the editing process continues.
Thanks.
#44
ST1100 Archive of Wisdom / (Stickie) AOW article pictures...
Last post by KoTAOW - December 03, 2012, 04:01:50 PMThere are a lot of articles in the AOW section that contain pictures that have been previously uploaded to Webshots. Over the years, it made sense to upload them to Webshots vs. st-riders.net.
Unfortunately, Webshots has been bought out by another company who is currently moving everything to another server.
Before the Webshot pictures were moved, they were downloaded and will eventually be uploaded to the st-riders.net server for safe keeping.
In the mean time, this means that some of the AOW articles will lose their attached pictures, until the KOTAOW can edit the articles and reference the correct links back to the pictures.
There are currently 178 ST1100 articles and 109 ST1300 articles.
Please be patient the next several months, while the editing process continues.
Thanks.
#45
ST1300 Archive of Wisdom / Re: AudioVox Cruise Tutorial (...
Last post by KoTAOW - June 08, 2012, 07:04:38 AMComments by John Oosterhuis, STOC #1058:
This is an excellent article, thanks Paul!
It's good to know that the unit can be opened up. Jim Neagle, STOC #8083, used Paul's pictures and description to fix his AudioVox which had stopped engaging. Just a bit of oil on the sticking vacuum solenoid was all that it took! Saved Jim from buying a whole new unit.
#46
ST1300 Archive of Wisdom / Re: AudioVox Cruise Tutorial (...
Last post by KoTAOW - June 08, 2012, 07:04:03 AMAudioVox Cruise Tutorial ( CCS-100 ) - ST1100\ST1300 - continued
After re-verifying point-to-point wiring was OK, +12VDC signals was measured to the board connector, the diaphragm and chamber held vacuum, and the board showed no evidence of damage; energizing the solenoids indicated the vac solenoid was stuck. After several hits with 12VDC, it loosened itself up. A drop of light machine oil in each port, connect it back to the bike, lock the throttle at 3000 RPM, hit on and set, voila!, all valves actuated. This could work. Re-assemble the servo, reset dip switches to the default mode, hook everything up, test ride and... it's alive! The CC works; on, set, accelerate, coast, off when brake is applied, resume; it's all there. Yea!!! Sometimes it takes digging deeper to solve the problem.
Here is what I learned during this process:
- Be careful disassembling the servo, tabs are easily broken off, especially the diaphragm chamber. I used five small metal tabs to take the top off. Go slow.
- When mating the the lower and upper servo halves, place the three small o-rings into the solenoid ports and not to the chamber tubes. It makes for effortless seating and the tabs click together easier. Once again be careful and work slowly, you don't want to break any of those tabs.
- Take your time in routing the wires and don't be afraid to cut the excess off. Routing the harness out of harms way pays off big. Loom your wires to prevent exposed wires.
When looming and using the cowl stay (frame) as a routing & anchor point, it is best to assemble the inner cowling. I had to re-position the wiring slightly and to the inside so it could slip past and meet with the main outer cowl. The convoluted tubing adds protection but also adds bulk.
After all the plastic was on, I noticed the vent opening where the mirror meets the fairing and thought of all the dust, grime, water, and insect ingress that could potentially wreak havoc to the electrical connections and servo so I chose to block it off. A plastic folder bought at Staples provided the right thickness and was trimmed and placed between mirror and fairing.
Well that's it. Fabricate a bracket and it's time to ride; I want to test the CC on its staying power on a long trip.


~~~
Bracketing done, project finished!
I brought the bike up to 75mph and with the modest slopes and valleys of our North TeXas highway system, the speed has held remarkably steady. When, with future maintenance, it is required to remove the airbox I will look at adding a vacuum canister but for now I am incredibly happy that the unit functions at it should.
Ride safe.

~~~
Thank You again for your contribution Paul Wilhelm, aka NikonHonda, STOC #8598
#47
ST1300 Archive of Wisdom / AudioVox Cruise Tutorial ( CCS...
Last post by KoTAOW - June 08, 2012, 07:03:34 AMSubmitted by Paul Wilhelm, aka NikonHonda, STOC #8598
Original article can be found here: http://www.st-owners.com/forums/showthread.php?112500-Need-opinion-on-CC-wiring-re-do
~~~
When I bought my 2004 ST1300, the Audiovox CC was not working so I tied up the wires and told myself it was for another time. The bike is at rest for three weeks so I decided to upgrade the headlamps and move the lights off the forks to the mirror area but that is for another post. I had all the plastic off and I looked at the CC and decided it was time.
Having experience in electro-mechanical assembly, I am meticulous in looming and routing wires in a tidy, flowing manner. In redoing the previous owner's attempt I was surprised to see poor soldering and crimp techniques, the mating of large gauge wire to small gauge, and wire taps too close to connectors.
Anyway, I separated the wire bundle and created three sub-harnesses: a harness out of the servo, a harness out of the control panel and one that ties the both together. All +12 volt signal wires have connectors installed and I went through a relay. I used a quick disconnect adapter set instead of the Y-harness to clean up the coil area. I tucked the noise suppressor on the blue wire in between the frame and coil. Next comes the electrical tests. In looking at the pictures does anyone have any opinion in what I did ?


~~~
Updated thumbnails of the install. Added schematic with kind permission from Dan Bergmen (www.bergmenengineering.com)
After looming and rerouting the wires, I test rode. Pressed "on,†green light lit up, push "set" and CC did not take.
Per the schematic troubleshooting guide, with ignition on, all switches operate as stated. Purple wire did not ground so I added a relay per the schematic. With the ignition on, continuity is now present when brake is released, verified w/ ohmmeter.
I tried setting the dip-switches two ways and both don’t work:
*1st: 1 on, 2 off, 3 off, 4 on, 5 off, 6 off, 7 on (as shown in the picture)
*2nd: 1 on, 2 off, 3 on, 4 off, 5 off, 6 off, 7 off
When CC is on, red LED on circuit board lights up when "set,†"res,†and "brake" is applied. With engine at idle, LED slowly blinks and speeds up with acceleration.
Is this still electrical or mechanical? The cable appears to be routed correctly with no binding. There is vacuum at the servo port but have no idea what constitutes enough vacuum. No vacuum canister was installed but did notice a large amount of hose used and coiled underneath the air-box.
Since everything appears to operate normal, could it be the motherboard? Diaphragm in the servo? Replace or repair the servo?
I really would like to make the CC work but I'm not going to spend much more time on this. Any thoughts would be helpful.
PS: found this link discussing problem (http://ecomodder.com/forum/showthread.php/audiovox-ccs-100-cruise-control-replacement-cant-do-4078.html)


~~~
For those of you who are curious on what is inside the Audiovox. Pretty simple set up.
The diaphragm looked good, no cracks or tears. It appears to be of good material, one that will last through temperature and time. Will test to verify it is air tight
Will energize the solenoids to see if they operate. After everything I have done I am convinced it is something in the servo that is not working. Board seems to be fine with no damaged or burnt components.


Original article can be found here: http://www.st-owners.com/forums/showthread.php?112500-Need-opinion-on-CC-wiring-re-do
~~~
AudioVox Cruise Tutorial ( CCS-100 ) - ST1100\ST1300
When I bought my 2004 ST1300, the Audiovox CC was not working so I tied up the wires and told myself it was for another time. The bike is at rest for three weeks so I decided to upgrade the headlamps and move the lights off the forks to the mirror area but that is for another post. I had all the plastic off and I looked at the CC and decided it was time.
Having experience in electro-mechanical assembly, I am meticulous in looming and routing wires in a tidy, flowing manner. In redoing the previous owner's attempt I was surprised to see poor soldering and crimp techniques, the mating of large gauge wire to small gauge, and wire taps too close to connectors.
Anyway, I separated the wire bundle and created three sub-harnesses: a harness out of the servo, a harness out of the control panel and one that ties the both together. All +12 volt signal wires have connectors installed and I went through a relay. I used a quick disconnect adapter set instead of the Y-harness to clean up the coil area. I tucked the noise suppressor on the blue wire in between the frame and coil. Next comes the electrical tests. In looking at the pictures does anyone have any opinion in what I did ?
~~~
Updated thumbnails of the install. Added schematic with kind permission from Dan Bergmen (www.bergmenengineering.com)
After looming and rerouting the wires, I test rode. Pressed "on,†green light lit up, push "set" and CC did not take.
Per the schematic troubleshooting guide, with ignition on, all switches operate as stated. Purple wire did not ground so I added a relay per the schematic. With the ignition on, continuity is now present when brake is released, verified w/ ohmmeter.
I tried setting the dip-switches two ways and both don’t work:
*1st: 1 on, 2 off, 3 off, 4 on, 5 off, 6 off, 7 on (as shown in the picture)
*2nd: 1 on, 2 off, 3 on, 4 off, 5 off, 6 off, 7 off
When CC is on, red LED on circuit board lights up when "set,†"res,†and "brake" is applied. With engine at idle, LED slowly blinks and speeds up with acceleration.
Is this still electrical or mechanical? The cable appears to be routed correctly with no binding. There is vacuum at the servo port but have no idea what constitutes enough vacuum. No vacuum canister was installed but did notice a large amount of hose used and coiled underneath the air-box.
Since everything appears to operate normal, could it be the motherboard? Diaphragm in the servo? Replace or repair the servo?
I really would like to make the CC work but I'm not going to spend much more time on this. Any thoughts would be helpful.
PS: found this link discussing problem (http://ecomodder.com/forum/showthread.php/audiovox-ccs-100-cruise-control-replacement-cant-do-4078.html)
~~~
For those of you who are curious on what is inside the Audiovox. Pretty simple set up.
The diaphragm looked good, no cracks or tears. It appears to be of good material, one that will last through temperature and time. Will test to verify it is air tight
Will energize the solenoids to see if they operate. After everything I have done I am convinced it is something in the servo that is not working. Board seems to be fine with no damaged or burnt components.
#48
ST1100 Archive of Wisdom / Re: AudioVox Cruise Tutorial (...
Last post by KoTAOW - June 08, 2012, 07:02:03 AMComments by John Oosterhuis, STOC #1058:
This is an excellent article, thanks Paul!
It's good to know that the unit can be opened up. Jim Neagle, STOC #8083, used Paul's pictures and description to fix his AudioVox which had stopped engaging. Just a bit of oil on the sticking vacuum solenoid was all that it took! Saved Jim from buying a whole new unit.
#49
ST1100 Archive of Wisdom / Re: AudioVox Cruise Tutorial (...
Last post by KoTAOW - May 31, 2012, 05:13:28 PMAudioVox Cruise Tutorial ( CCS-100 ) - ST1100\ST1300 - continued
After re-verifying point-to-point wiring was OK, +12VDC signals was measured to the board connector, the diaphragm and chamber held vacuum, and the board showed no evidence of damage; energizing the solenoids indicated the vac solenoid was stuck. After several hits with 12VDC, it loosened itself up. A drop of light machine oil in each port, connect it back to the bike, lock the throttle at 3000 RPM, hit on and set, voila!, all valves actuated. This could work. Re-assemble the servo, reset dip switches to the default mode, hook everything up, test ride and... it's alive! The CC works; on, set, accelerate, coast, off when brake is applied, resume; it's all there. Yea!!! Sometimes it takes digging deeper to solve the problem.
Here is what I learned during this process:
- Be careful disassembling the servo, tabs are easily broken off, especially the diaphragm chamber. I used five small metal tabs to take the top off. Go slow.
- When mating the the lower and upper servo halves, place the three small o-rings into the solenoid ports and not to the chamber tubes. It makes for effortless seating and the tabs click together easier. Once again be careful and work slowly, you don't want to break any of those tabs.
- Take your time in routing the wires and don't be afraid to cut the excess off. Routing the harness out of harms way pays off big. Loom your wires to prevent exposed wires.
When looming and using the cowl stay (frame) as a routing & anchor point, it is best to assemble the inner cowling. I had to re-position the wiring slightly and to the inside so it could slip past and meet with the main outer cowl. The convoluted tubing adds protection but also adds bulk.
After all the plastic was on, I noticed the vent opening where the mirror meets the fairing and thought of all the dust, grime, water, and insect ingress that could potentially wreak havoc to the electrical connections and servo so I chose to block it off. A plastic folder bought at Staples provided the right thickness and was trimmed and placed between mirror and fairing.
Well that's it. Fabricate a bracket and it's time to ride; I want to test the CC on its staying power on a long trip.
%20-%20ST1100-ST1300/Pic%2031.jpg)
%20-%20ST1100-ST1300/Pic%2032.jpg)
%20-%20ST1100-ST1300/Pic%2033.jpg)
%20-%20ST1100-ST1300/Pic%2034.jpg)
%20-%20ST1100-ST1300/Pic%2035.jpg)
~~~
Bracketing done, project finished!
I brought the bike up to 75mph and with the modest slopes and valleys of our North TeXas highway system, the speed has held remarkably steady. When, with future maintenance, it is required to remove the airbox I will look at adding a vacuum canister but for now I am incredibly happy that the unit functions at it should.
Ride safe.
%20-%20ST1100-ST1300/Pic%2036.jpg)
~~~
Thank You again for your contribution Paul Wilhelm, aka NikonHonda, STOC #8598
#50
ST1100 Archive of Wisdom / AudioVox Cruise Tutorial ( CCS...
Last post by KoTAOW - May 31, 2012, 04:56:59 PMSubmitted by Paul Wilhelm, aka NikonHonda, STOC #8598
Original article can be found here: http://www.st-owners.com/forums/showthread.php?112500-Need-opinion-on-CC-wiring-re-do
~~~
When I bought my 2004 ST1300, the Audiovox CC was not working so I tied up the wires and told myself it was for another time. The bike is at rest for three weeks so I decided to upgrade the headlamps and move the lights off the forks to the mirror area but that is for another post. I had all the plastic off and I looked at the CC and decided it was time.
Having experience in electro-mechanical assembly, I am meticulous in looming and routing wires in a tidy, flowing manner. In redoing the previous owner's attempt I was surprised to see poor soldering and crimp techniques, the mating of large gauge wire to small gauge, and wire taps too close to connectors.
Anyway, I separated the wire bundle and created three sub-harnesses: a harness out of the servo, a harness out of the control panel and one that ties the both together. All +12 volt signal wires have connectors installed and I went through a relay. I used a quick disconnect adapter set instead of the Y-harness to clean up the coil area. I tucked the noise suppressor on the blue wire in between the frame and coil. Next comes the electrical tests. In looking at the pictures does anyone have any opinion in what I did ?
%20-%20ST1100-ST1300/Pic%201.jpg)
%20-%20ST1100-ST1300/Pic%202.jpg)
%20-%20ST1100-ST1300/Pic%203.jpg)
%20-%20ST1100-ST1300/Pic%204.jpg)
%20-%20ST1100-ST1300/Pic%205.jpg)
%20-%20ST1100-ST1300/Pic%206.jpg)
%20-%20ST1100-ST1300/Pic%207.jpg)
%20-%20ST1100-ST1300/Pic%208.jpg)
%20-%20ST1100-ST1300/Pic%209.jpg)
%20-%20ST1100-ST1300/Pic%2010.jpg)
%20-%20ST1100-ST1300/Pic%2011.jpg)
%20-%20ST1100-ST1300/Pic%2012.jpg)
%20-%20ST1100-ST1300/Pic%2013.jpg)
%20-%20ST1100-ST1300/Pic%2014.jpg)
~~~
Updated thumbnails of the install. Added schematic with kind permission from Dan Bergmen (www.bergmenengineering.com)
After looming and rerouting the wires, I test rode. Pressed "on,†green light lit up, push "set" and CC did not take.
Per the schematic troubleshooting guide, with ignition on, all switches operate as stated. Purple wire did not ground so I added a relay per the schematic. With the ignition on, continuity is now present when brake is released, verified w/ ohmmeter.
I tried setting the dip-switches two ways and both don’t work:
*1st: 1 on, 2 off, 3 off, 4 on, 5 off, 6 off, 7 on (as shown in the picture)
*2nd: 1 on, 2 off, 3 on, 4 off, 5 off, 6 off, 7 off
When CC is on, red LED on circuit board lights up when "set,†"res,†and "brake" is applied. With engine at idle, LED slowly blinks and speeds up with acceleration.
Is this still electrical or mechanical? The cable appears to be routed correctly with no binding. There is vacuum at the servo port but have no idea what constitutes enough vacuum. No vacuum canister was installed but did notice a large amount of hose used and coiled underneath the air-box.
Since everything appears to operate normal, could it be the motherboard? Diaphragm in the servo? Replace or repair the servo?
I really would like to make the CC work but I'm not going to spend much more time on this. Any thoughts would be helpful.
PS: found this link discussing problem (http://ecomodder.com/forum/showthread.php/audiovox-ccs-100-cruise-control-replacement-cant-do-4078.html)
%20-%20ST1100-ST1300/Pic%2015.jpg)
%20-%20ST1100-ST1300/Pic%2016.jpg)
%20-%20ST1100-ST1300/Pic%2017.jpg)
~~~
For those of you who are curious on what is inside the Audiovox. Pretty simple set up.
The diaphragm looked good, no cracks or tears. It appears to be of good material, one that will last through temperature and time. Will test to verify it is air tight
Will energize the solenoids to see if they operate. After everything I have done I am convinced it is something in the servo that is not working. Board seems to be fine with no damaged or burnt components.
%20-%20ST1100-ST1300/Pic%2018.jpg)
%20-%20ST1100-ST1300/Pic%2019.jpg)
%20-%20ST1100-ST1300/Pic%2020.jpg)
%20-%20ST1100-ST1300/Pic%2021.jpg)
%20-%20ST1100-ST1300/Pic%2022.jpg)
%20-%20ST1100-ST1300/Pic%2023.jpg)
%20-%20ST1100-ST1300/Pic%2024.jpg)
%20-%20ST1100-ST1300/Pic%2025.jpg)
%20-%20ST1100-ST1300/Pic%2026.jpg)
%20-%20ST1100-ST1300/Pic%2027.jpg)
%20-%20ST1100-ST1300/Pic%2028.jpg)
%20-%20ST1100-ST1300/Pic%2029.jpg)
%20-%20ST1100-ST1300/Pic%2030.jpg)
Original article can be found here: http://www.st-owners.com/forums/showthread.php?112500-Need-opinion-on-CC-wiring-re-do
~~~
AudioVox Cruise Tutorial ( CCS-100 ) - ST1100\ST1300
When I bought my 2004 ST1300, the Audiovox CC was not working so I tied up the wires and told myself it was for another time. The bike is at rest for three weeks so I decided to upgrade the headlamps and move the lights off the forks to the mirror area but that is for another post. I had all the plastic off and I looked at the CC and decided it was time.
Having experience in electro-mechanical assembly, I am meticulous in looming and routing wires in a tidy, flowing manner. In redoing the previous owner's attempt I was surprised to see poor soldering and crimp techniques, the mating of large gauge wire to small gauge, and wire taps too close to connectors.
Anyway, I separated the wire bundle and created three sub-harnesses: a harness out of the servo, a harness out of the control panel and one that ties the both together. All +12 volt signal wires have connectors installed and I went through a relay. I used a quick disconnect adapter set instead of the Y-harness to clean up the coil area. I tucked the noise suppressor on the blue wire in between the frame and coil. Next comes the electrical tests. In looking at the pictures does anyone have any opinion in what I did ?
~~~
Updated thumbnails of the install. Added schematic with kind permission from Dan Bergmen (www.bergmenengineering.com)
After looming and rerouting the wires, I test rode. Pressed "on,†green light lit up, push "set" and CC did not take.
Per the schematic troubleshooting guide, with ignition on, all switches operate as stated. Purple wire did not ground so I added a relay per the schematic. With the ignition on, continuity is now present when brake is released, verified w/ ohmmeter.
I tried setting the dip-switches two ways and both don’t work:
*1st: 1 on, 2 off, 3 off, 4 on, 5 off, 6 off, 7 on (as shown in the picture)
*2nd: 1 on, 2 off, 3 on, 4 off, 5 off, 6 off, 7 off
When CC is on, red LED on circuit board lights up when "set,†"res,†and "brake" is applied. With engine at idle, LED slowly blinks and speeds up with acceleration.
Is this still electrical or mechanical? The cable appears to be routed correctly with no binding. There is vacuum at the servo port but have no idea what constitutes enough vacuum. No vacuum canister was installed but did notice a large amount of hose used and coiled underneath the air-box.
Since everything appears to operate normal, could it be the motherboard? Diaphragm in the servo? Replace or repair the servo?
I really would like to make the CC work but I'm not going to spend much more time on this. Any thoughts would be helpful.
PS: found this link discussing problem (http://ecomodder.com/forum/showthread.php/audiovox-ccs-100-cruise-control-replacement-cant-do-4078.html)
~~~
For those of you who are curious on what is inside the Audiovox. Pretty simple set up.
The diaphragm looked good, no cracks or tears. It appears to be of good material, one that will last through temperature and time. Will test to verify it is air tight
Will energize the solenoids to see if they operate. After everything I have done I am convinced it is something in the servo that is not working. Board seems to be fine with no damaged or burnt components.