- Welcome to ST-Riders - The liST.

The Original ST1100/ST1300 Forum
Recent posts
#51
ST1100 Archive of Wisdom / Re: Clutch Diode Information (...
Last post by KoTAOW - May 04, 2012, 05:06:16 PMOEM diode pack can be replaced using general purpose diodes available at Radio Shack or any other electronic component source.
Radio Shack: http://www.radioshack.com/product/index.jsp?productId=2062578
1N5402 or # 276-1143
3 amp, 200 v PIV
$1.69 each.
~~~
Need two diodes ( 1N5402 )

and some insulated crimp terminals ( 3 x red ).

Twist together the cathodes ( banded end ) and crimp on an insulated terminal.
Crimp insulated terminals to each of the remain anodes ( Un-banned end )
Looking at wiring diagram below:
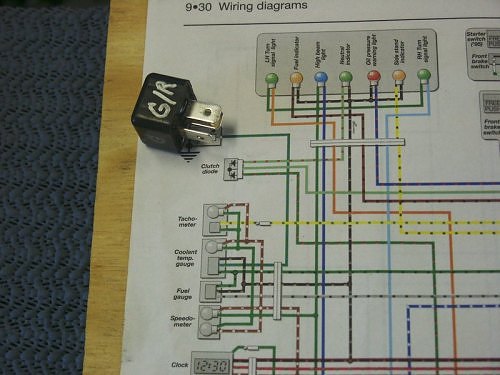
The end with the twisted leads into a single insulated terminal connect to the GREEN wire.
The remaining diode ends connect to the GREEN\RED wire and the other wire.
Radio Shack: http://www.radioshack.com/product/index.jsp?productId=2062578
1N5402 or # 276-1143
3 amp, 200 v PIV
$1.69 each.
~~~
Need two diodes ( 1N5402 )
and some insulated crimp terminals ( 3 x red ).
Twist together the cathodes ( banded end ) and crimp on an insulated terminal.
Crimp insulated terminals to each of the remain anodes ( Un-banned end )
Looking at wiring diagram below:
The end with the twisted leads into a single insulated terminal connect to the GREEN wire.
The remaining diode ends connect to the GREEN\RED wire and the other wire.
#52
ST1300 Archive of Wisdom / Re: Quartet Harness Installati...
Last post by KoTAOW - May 03, 2012, 03:34:39 PM #53
ST1100 Archive of Wisdom / Homemade Deflector Farkle Set ...
Last post by KoTAOW - April 28, 2012, 07:22:15 PMSubmitted by Mike Breton, STOC #7966
Original article can be found here: http://www.st-owners.com/forums/showthread.php?51340-ST1100-10-Homemade-deflector-farkle-set
~~~
I wanted some temporary wind deflectors for my 3600 mile ride to Key West and back to New England in chilly October (I leave this Friday). So here’s a brief write up of how I saved money by making my own using a shoestring budget, elbow grease, and 1 hour.
Stopped at Lowe's and picked up about 10 dollars in supplies.
* Plexiglas®
* Industrial double sided sticky foam
* Cheap plain ceramic tiles.
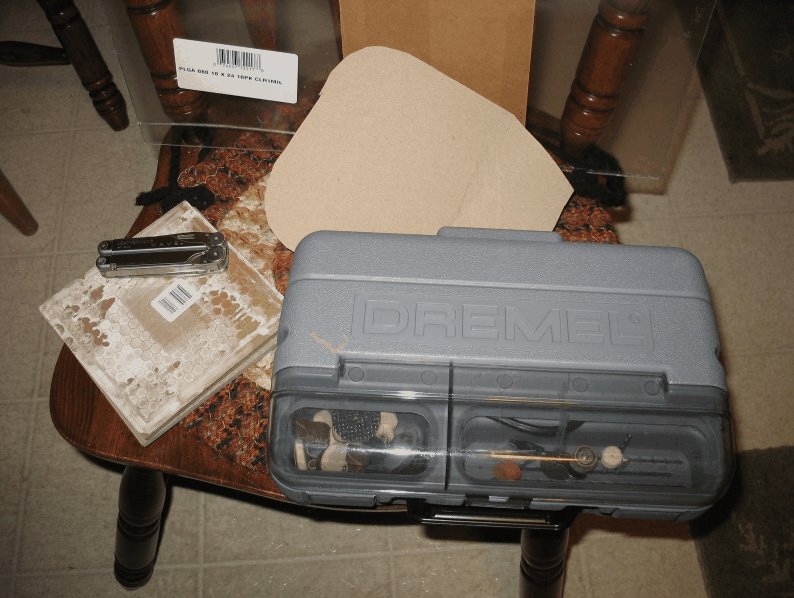
Plus tools I already own.
* Dremel®
* Leatherman®
* Cardboard
* Sharpie®
First you make the part out of cardboard before any cutting is done.
Then trace your cardboard design on the piece.
Score the Plexiglas® and break it to the desired size.
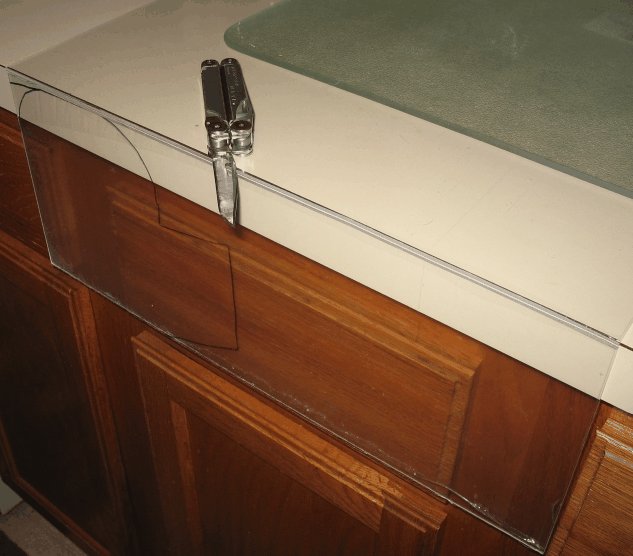
Now you can use the Dremel® tool to carve the shape out of the Plexiglass®.
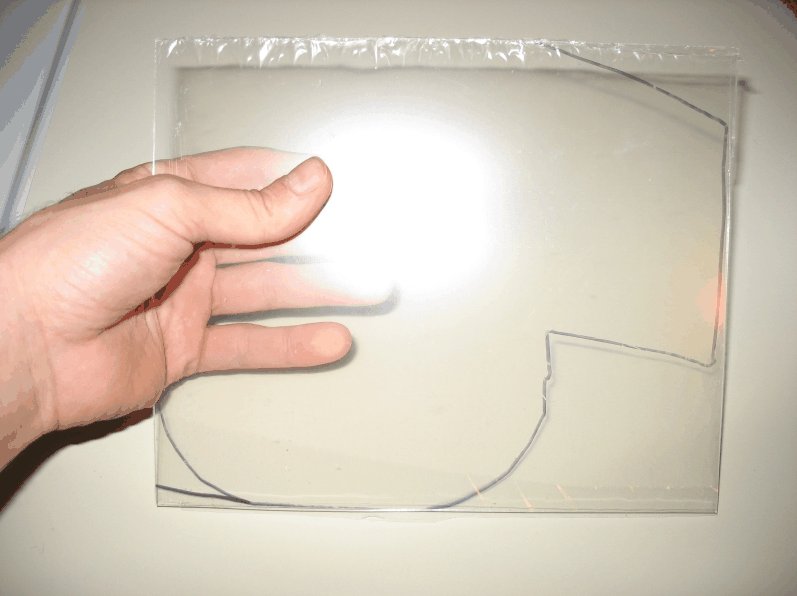
Once the piece is cut out, you can bend it to the right angle.
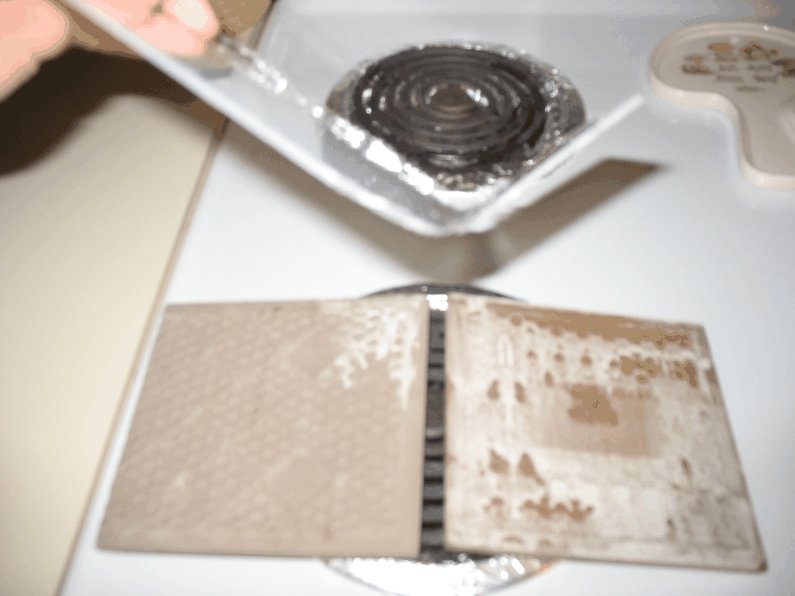
I bought 2 cheap pieces of plain tile and placed them a inch apart on top of a burner. A wider gap makes a rounder bend. Turn the burner to just past medium and hold the plexiglass close till it becomes pliable over the gap. Then gently bend to just past the desired angle, it will relax to the angle you want as it cools.
WARNING: use safety protection, ceramic tiles may explode if they have a bubble hidden in them.
WARNING: I am told glazed tile emit lead when heated, so use Unglazed Quarry Tile (Look for Fireclay brand, or "All natural clay and shale" or "Lead-Free").
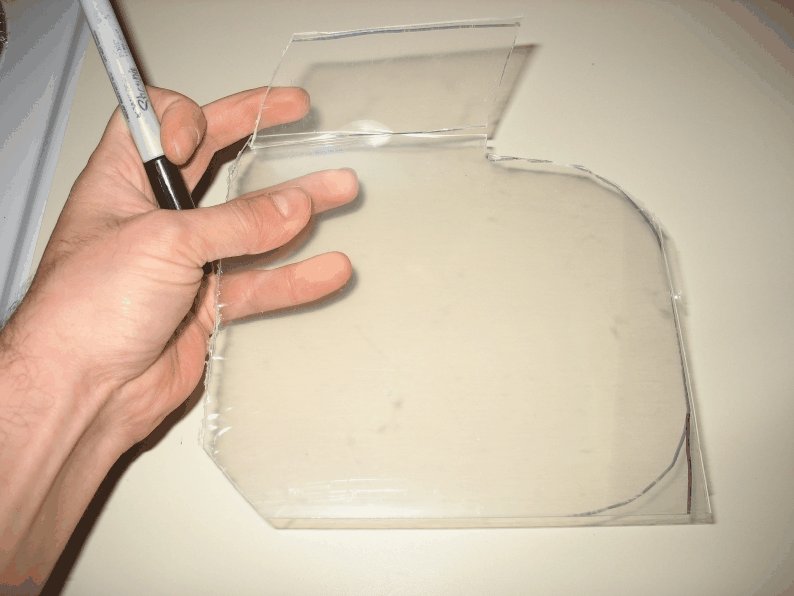
Tip: Cool pieces in fridge before removing protective plastic film, it will come off a lot easier.
Tip: Remember to bend the left and the right side in opposite directions.
Plexiglass® is fragile, careful you do not bend too far, or you will have to restart like I did.
Now affix the double sided sticky foam to the piece.
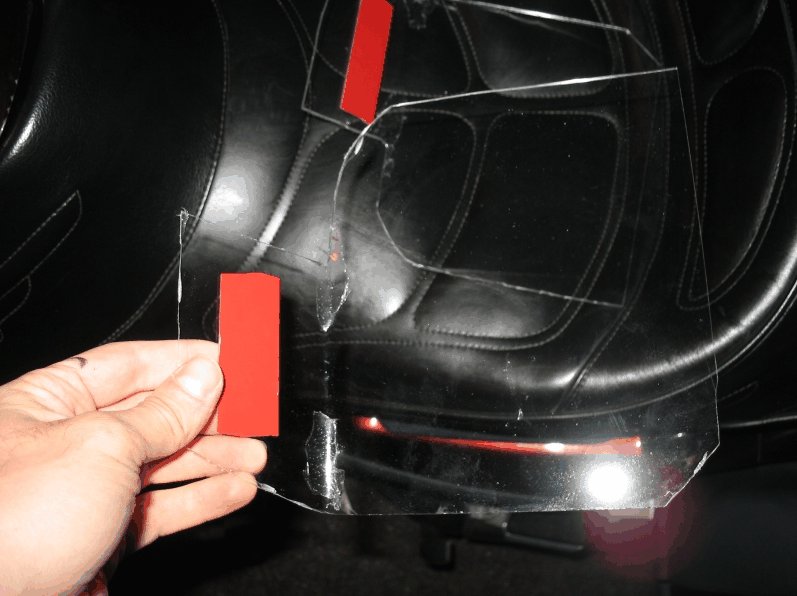
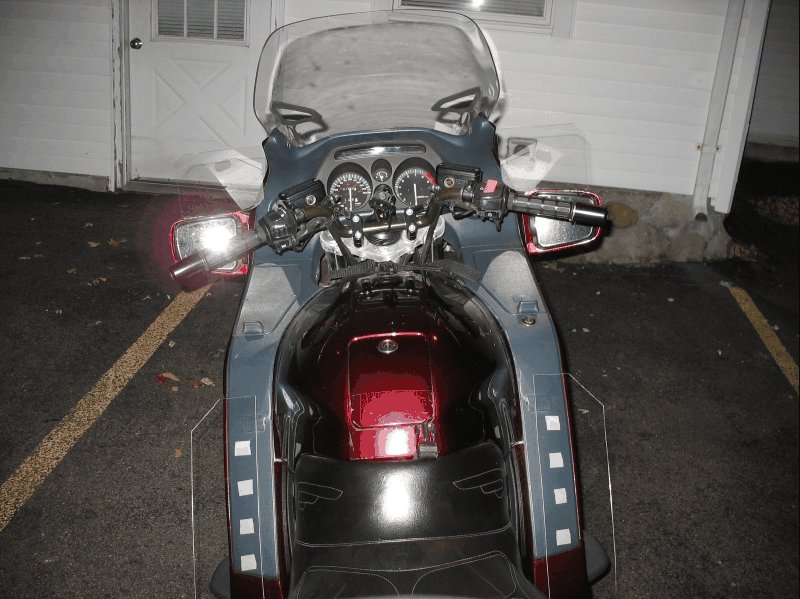
Install and enjoy.

NOTE: The pieces installed over the mirrors to deflect the wind that would otherwise beat down on my fingers. The pieces easily slip between the mirror and the mirror cover. They are too thin to be permanent, a curious passerby could snap them off with little effort. I also threw on a couple simple shin guards.
Should you wish for a little more longevity, I would make them using Lexan. It is twice as hard to break, bend, and cut. But should last the life of the bike.
~~~
UPDATE:
I would definitely remake them with better material next time. Probably Lexan®. But I was covered head to toe with gear, so if they shattered it would not phase me.
They held up, except when turning around in a dark parking lot in Florida I was surprised to find out it was not a parking lot, but a field of smooth beach sand gobbling my front wheel.
Quick reaction sprung my legs out and saved my bike but my leg hit the right shin shield and broke the corner off, so 45 degree them next time.
Also, I am very glad I had them because the last day of the trip it hit zero degrees outside all the way from NY to Eastern MA. Burrr! So much pain, buying heated gloves before the fall, and that's a promise.
~~~
Thank You again for your contribution Mike Breton, STOC #7966
Original article can be found here: http://www.st-owners.com/forums/showthread.php?51340-ST1100-10-Homemade-deflector-farkle-set
~~~
Homemade Deflector Farkle Set ( ST1100 )
I wanted some temporary wind deflectors for my 3600 mile ride to Key West and back to New England in chilly October (I leave this Friday). So here’s a brief write up of how I saved money by making my own using a shoestring budget, elbow grease, and 1 hour.
Stopped at Lowe's and picked up about 10 dollars in supplies.
* Plexiglas®
* Industrial double sided sticky foam
* Cheap plain ceramic tiles.
Plus tools I already own.
* Dremel®
* Leatherman®
* Cardboard
* Sharpie®
First you make the part out of cardboard before any cutting is done.
Then trace your cardboard design on the piece.
Score the Plexiglas® and break it to the desired size.
Now you can use the Dremel® tool to carve the shape out of the Plexiglass®.
Once the piece is cut out, you can bend it to the right angle.
I bought 2 cheap pieces of plain tile and placed them a inch apart on top of a burner. A wider gap makes a rounder bend. Turn the burner to just past medium and hold the plexiglass close till it becomes pliable over the gap. Then gently bend to just past the desired angle, it will relax to the angle you want as it cools.
WARNING: use safety protection, ceramic tiles may explode if they have a bubble hidden in them.
WARNING: I am told glazed tile emit lead when heated, so use Unglazed Quarry Tile (Look for Fireclay brand, or "All natural clay and shale" or "Lead-Free").
Tip: Cool pieces in fridge before removing protective plastic film, it will come off a lot easier.
Tip: Remember to bend the left and the right side in opposite directions.
Plexiglass® is fragile, careful you do not bend too far, or you will have to restart like I did.
Now affix the double sided sticky foam to the piece.
Install and enjoy.
NOTE: The pieces installed over the mirrors to deflect the wind that would otherwise beat down on my fingers. The pieces easily slip between the mirror and the mirror cover. They are too thin to be permanent, a curious passerby could snap them off with little effort. I also threw on a couple simple shin guards.
Should you wish for a little more longevity, I would make them using Lexan. It is twice as hard to break, bend, and cut. But should last the life of the bike.
~~~
UPDATE:
I would definitely remake them with better material next time. Probably Lexan®. But I was covered head to toe with gear, so if they shattered it would not phase me.
They held up, except when turning around in a dark parking lot in Florida I was surprised to find out it was not a parking lot, but a field of smooth beach sand gobbling my front wheel.
Quick reaction sprung my legs out and saved my bike but my leg hit the right shin shield and broke the corner off, so 45 degree them next time.
Also, I am very glad I had them because the last day of the trip it hit zero degrees outside all the way from NY to Eastern MA. Burrr! So much pain, buying heated gloves before the fall, and that's a promise.
~~~
Thank You again for your contribution Mike Breton, STOC #7966
#54
ST1100 Archive of Wisdom / Re: Mirror Wind Deflectors, Do...
Last post by KoTAOW - April 25, 2012, 06:46:58 AMComments by Norm Keller, STOC #8030:
Mine are made from 1/16" clear Lexan® and are held by double sided tape although did attach them by "Dum-Dum" (strip putty for body sealing), either seems to suffice. I like to use attachment which doesn't increase the break-away effort for the mirror covers too much.
Mine are made from 1/16" clear Lexan® and are held by double sided tape although did attach them by "Dum-Dum" (strip putty for body sealing), either seems to suffice. I like to use attachment which doesn't increase the break-away effort for the mirror covers too much.
#55
ST1100 Archive of Wisdom / Mirror Wind Deflectors, Do It ...
Last post by KoTAOW - April 23, 2012, 08:39:06 AMSubmitted by Patrick O'Bryant, aka sirepair, STOC #7105
Original article can be found here: El-Cheapo-Mirror-Wind-Deflectors
~~~
Made these up last year but never got around to do a write-up, so here is the belated one:
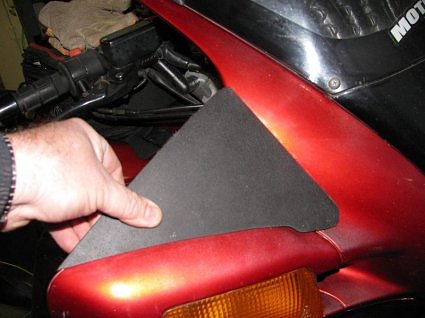
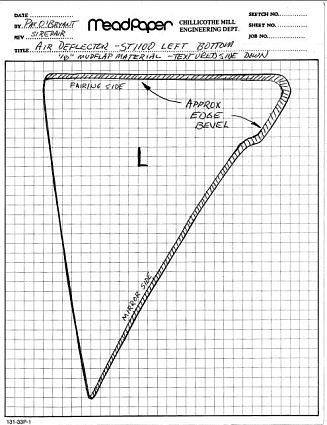
OK, so I'm a pretty frugal guy and dangerous with sharp objects, so I made a set of Mirror Wind Deflectors for my ST1100. I have the fairing deflectors (bought used) but did not get the mirror deflectors. I utilized a $10.00 set of generic mud flaps from my local auto parts store.
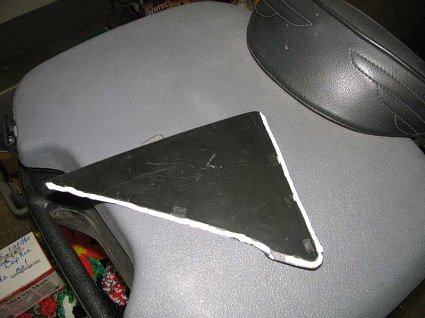
I played around with some card board to get the shape right, then hacked out the shapes from the plastic using a box knife. I left the textured side up to go along with the gray plastic parts (though the mud flaps are black).
I had to bevel the edges a bit to get a tight fit. For this I utilized a drum sander bit on my Dremel tool. BE CAREFUL as the course drums will remove a lot of material from the mud flaps quite quickly! Maybe practice on a piece of scrap first...
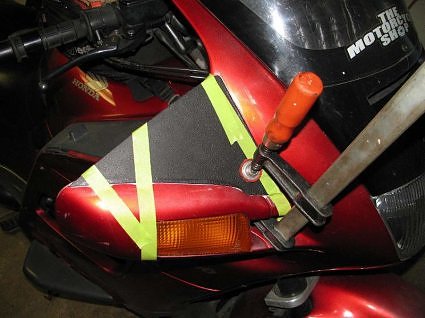
I did not want to mount them with fasteners so I tried to mount them (last year) with some 2-sided molding tape. But I think my tape was old and I had some issues with it sticking. So I utilized some black silicone (RTV). Took a bit of elbow grease to remove the remaining RTV once I removed the deflectors for summer riding.
This time, I'm using a GE bathroom caulk (goes on white, dries clear) and hopefully it will be a bit easier to remove. I simply ran a bead around the 2 edges of the deflectors that will stick to the fairing and mirror.
**UPDATE** Use Permatex black RTV for easier removal. The GE stuff was a P.I.T.A. to remove!
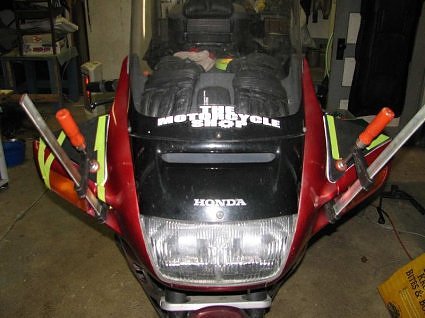
Using some masking tape and a clamps I positioned the deflectors and left them to dry overnight.
I was pretty happy with both the looks and function of this farkle. The deflectors do a good job of keeping wind and rain off of my hands. And at about $13.00 ($10 mud flaps, $3 silicone) it's hard to go wrong!
And so ends another episode of "the Frugal Farkler"!! Tune in next time when I make a RAM ball GPS mount from a goat's testicle.....
~~~

~~~
Left side.
Right side.
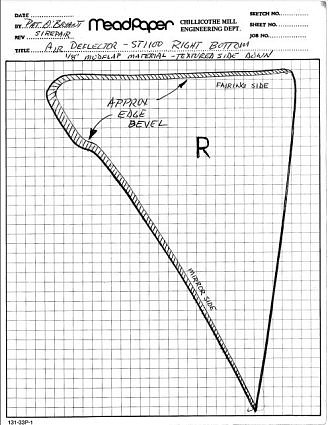
NOTE: PDF file attached below with scale trace of deflectors
~~~
Thank You again for your contribution Patrick O'Bryant, aka sirepair, STOC #7105
Original article can be found here: El-Cheapo-Mirror-Wind-Deflectors
~~~
Mirror Wind Deflectors, Do It Yourself ( ST1100 )
Made these up last year but never got around to do a write-up, so here is the belated one:
OK, so I'm a pretty frugal guy and dangerous with sharp objects, so I made a set of Mirror Wind Deflectors for my ST1100. I have the fairing deflectors (bought used) but did not get the mirror deflectors. I utilized a $10.00 set of generic mud flaps from my local auto parts store.
I played around with some card board to get the shape right, then hacked out the shapes from the plastic using a box knife. I left the textured side up to go along with the gray plastic parts (though the mud flaps are black).
I had to bevel the edges a bit to get a tight fit. For this I utilized a drum sander bit on my Dremel tool. BE CAREFUL as the course drums will remove a lot of material from the mud flaps quite quickly! Maybe practice on a piece of scrap first...
I did not want to mount them with fasteners so I tried to mount them (last year) with some 2-sided molding tape. But I think my tape was old and I had some issues with it sticking. So I utilized some black silicone (RTV). Took a bit of elbow grease to remove the remaining RTV once I removed the deflectors for summer riding.
This time, I'm using a GE bathroom caulk (goes on white, dries clear) and hopefully it will be a bit easier to remove. I simply ran a bead around the 2 edges of the deflectors that will stick to the fairing and mirror.
**UPDATE** Use Permatex black RTV for easier removal. The GE stuff was a P.I.T.A. to remove!
Using some masking tape and a clamps I positioned the deflectors and left them to dry overnight.
I was pretty happy with both the looks and function of this farkle. The deflectors do a good job of keeping wind and rain off of my hands. And at about $13.00 ($10 mud flaps, $3 silicone) it's hard to go wrong!
And so ends another episode of "the Frugal Farkler"!! Tune in next time when I make a RAM ball GPS mount from a goat's testicle.....
~~~
~~~
Left side.
Right side.
NOTE: PDF file attached below with scale trace of deflectors
~~~
Thank You again for your contribution Patrick O'Bryant, aka sirepair, STOC #7105
#56
ST1300 Archive of Wisdom / Re: HID Conversion - VVME Kit ...
Last post by KoTAOW - April 15, 2012, 06:13:28 PMComments by Randy Quam, STOC #2761:
I agree with John's assessment of this product.
I am on my second season with mine and they perform very well. Installation is easy. Ballast location is a challenge but there are options. Jeff B. showed me these lights @ Minden WESTOC so he has had his for more than 3 years now. Customer service and delivery from China came as promised. IMHO these are a far better solution than the PIAA Halogen Super Whites bulbs for the main bucket.
The only caution I have on this lighting package is the high amount of EMI from the ballast. If you have a CB on your bike you may have an issue around noise.
~~~
Comments by WJ Bertrand, STOC #025:
Three years as of yesterday since installing my VVME HIDs with nary a hiccup. Can't say the same for the LED position lights - both have been replaced once.
#57
ST1300 Archive of Wisdom / Suspension Setup ( ST1300 ) *
Last post by KoTAOW - April 10, 2012, 06:22:39 AMSubmitted by John Herring, aka JohnnyRide
Original article can be found here: Suspension Setup
~~~
A more exacting method:
For a base-line set-up you can do the following and then fine-tune from there. (You'll need some friends to help you measure since you'll be on the bike.)
- Put the bike on the center stand to get the rear wheel off the ground and extend the suspension.
- Use a measuring tape to measure from the center axle up vertically to a point on the chassis. Measure in millimeters to make doing the math easier. Record this measurement and label it M1.
- Take the bike off the stand and have a couple of folks help hold the bike up while you get on it in riding position. Have a third friend push the rear down about an inch and let the rear come back up slowly (don't bounce it). When the suspension stops, measure from the center axle to the chasis point you measured to before. Record this measurement and label it M2.
- With you still in the riding position get your third friend to lift up on the rear of the bike about an inch and let it settle slowly (still no bouncing). The measure again from the center axle to the chassis point. Record this measurement and label it M3.
Do the following math:
M1 - [(M2+M3)/2]
This gives you your static spring sag. Ideally your sag should be set somewhere around 28-33% of total travel for street riding (front and rear) which translates to somewhere between 30-35 millimeters. Too much sag means you need more preload while too little sag means you need less preload. If you run out all your adjustment and still have too much sag you'll need stiffer springs. If you run out all your adjustment and have too little sag you'll need shorter or lighter springs.
You do the same thing to measure your front sag and you'll want 30-35 millimeters of sag there as well. Since the ST doesn't have front suspension adjustments you may find you need to adjust the thickness of the oil, add spacers, cut the springs (not likely), or get different springs in order to get a good sag set-up.
Doing the above will give you a base-line suspension set-up for front and rear. You can then adjust that further based on your riding style and preferences. If you're planning a track day, you might want to stiffen things up and run it in the 23-27% range (25-30mm) because you're not worried about road bumps or uneven pavement. For daily riding you might decide you want things to run a bit softer and run your sag closer to 33% (35mm). Then for twisties you might decide to run in the 27-28% range.
Prior to doing these measurements, I set up my suspension based on what others on this board had suggested with my preload and damping set extremely stiff. I did these measurements and found my preload about right (2 1/2 lines visible) but my rebound damping was way too stiff. I had the rebound a half turn out from full and needed to bring it to about four half turns out from full (with riding, I've since adjusted it to three half turns from full). I was reluctant to do it because of all the high-speed wobble threads etc. but was amazed at how much more sure-footed the ST felt with the sag properly set.
Down and dirty version:
So to set your damping, set it to full hard and bounce it. It will look like the suspension is sticking. Now set it to full soft and bounce it. It will pogo so fast that it actually pulls the wheel off the ground and oscillate. Now, turn it back to full hard and dial it out 2 full turns. Bounce it and it will come up and settle without oscillating. If it oscillates, turn it a 1/4 turn towards hard and bounce it again. This will be darn close to "just right." Play around in 1/4 turns to get it dialed in perfectly - it should come up and settle without looking like it's sticking.
~~~
Thank You again for your contribution John Herring, aka JohnnyRide
Original article can be found here: Suspension Setup
~~~
Suspension Setup ( ST1300 )
A more exacting method:
For a base-line set-up you can do the following and then fine-tune from there. (You'll need some friends to help you measure since you'll be on the bike.)
- Put the bike on the center stand to get the rear wheel off the ground and extend the suspension.
- Use a measuring tape to measure from the center axle up vertically to a point on the chassis. Measure in millimeters to make doing the math easier. Record this measurement and label it M1.
- Take the bike off the stand and have a couple of folks help hold the bike up while you get on it in riding position. Have a third friend push the rear down about an inch and let the rear come back up slowly (don't bounce it). When the suspension stops, measure from the center axle to the chasis point you measured to before. Record this measurement and label it M2.
- With you still in the riding position get your third friend to lift up on the rear of the bike about an inch and let it settle slowly (still no bouncing). The measure again from the center axle to the chassis point. Record this measurement and label it M3.
Do the following math:
M1 - [(M2+M3)/2]
This gives you your static spring sag. Ideally your sag should be set somewhere around 28-33% of total travel for street riding (front and rear) which translates to somewhere between 30-35 millimeters. Too much sag means you need more preload while too little sag means you need less preload. If you run out all your adjustment and still have too much sag you'll need stiffer springs. If you run out all your adjustment and have too little sag you'll need shorter or lighter springs.
You do the same thing to measure your front sag and you'll want 30-35 millimeters of sag there as well. Since the ST doesn't have front suspension adjustments you may find you need to adjust the thickness of the oil, add spacers, cut the springs (not likely), or get different springs in order to get a good sag set-up.
Doing the above will give you a base-line suspension set-up for front and rear. You can then adjust that further based on your riding style and preferences. If you're planning a track day, you might want to stiffen things up and run it in the 23-27% range (25-30mm) because you're not worried about road bumps or uneven pavement. For daily riding you might decide you want things to run a bit softer and run your sag closer to 33% (35mm). Then for twisties you might decide to run in the 27-28% range.
Prior to doing these measurements, I set up my suspension based on what others on this board had suggested with my preload and damping set extremely stiff. I did these measurements and found my preload about right (2 1/2 lines visible) but my rebound damping was way too stiff. I had the rebound a half turn out from full and needed to bring it to about four half turns out from full (with riding, I've since adjusted it to three half turns from full). I was reluctant to do it because of all the high-speed wobble threads etc. but was amazed at how much more sure-footed the ST felt with the sag properly set.
Down and dirty version:
So to set your damping, set it to full hard and bounce it. It will look like the suspension is sticking. Now set it to full soft and bounce it. It will pogo so fast that it actually pulls the wheel off the ground and oscillate. Now, turn it back to full hard and dial it out 2 full turns. Bounce it and it will come up and settle without oscillating. If it oscillates, turn it a 1/4 turn towards hard and bounce it again. This will be darn close to "just right." Play around in 1/4 turns to get it dialed in perfectly - it should come up and settle without looking like it's sticking.
~~~
Thank You again for your contribution John Herring, aka JohnnyRide
#58
ST1300 Archive of Wisdom / Hella FF50 Driving SpotLights ...
Last post by KoTAOW - April 09, 2012, 05:30:38 PMSubmitted by John Herring, aka JohnnyRide
Original article can be found here: Hella FF50 Driving Spotlights
~~~

You will want to install a dedicated power harness w/relay along with this setup to protect the factory relays and wiring of your investment. Do it, don't ask why. To connect your new spotlights see this Gadget page as there isn't much point in me rewriting anything on that. Adaptable relay harnesses are always available from sources such as Pepboys®, Walmart® and, Autozone®, to name a few. Usually around $20.
I found a set of Hella FF50 driving lights and installed them high on the engine guards on my former bike. They are black plastic, oval in appearance and are H7 bulb based. These suckers kick butt and illuminate the hell out of the road ahead. There is no way you could drive around at night with on coming traffic. They would be leaning out their windows trying to shoot the lights out. Way bright. But for lonely back road night driving, they do an outstanding job. Got them off EBAY for $35. The normal price is $70-$80 for the pair.

This is an accurate representation of the output.

Use the wiring diagram link above as your guide to connect these night burners.
TurboCity under the mirror mounting system
Finished product, to the left, looks like it might sting you or something.

Side shot.... excuse the fingerprints and dirt.

Wires are ready for soldering, heat shrinking the joints and pulling the runs though the mounts from TurboCity. Nice and clean looking.


I always reverse the connectors so it is impossible to plug them together the wrong way.

I sure hope I remember what I did today.... Thank goodness the fairing hides this stuff. The Stebel 139db air horn is there and it relayed circuit as well as the Hella relay and associated wiring.

LOL... long day but it was worth it... You can see my laptop to the left so I could hit the ST Forum if I got stuck on something.

As a foot note to the TurboCity under the mirror brackets, I will say this, I took them off. I don't like the way they mount or look. There is a good degree of vibration passed to the lights during motion. They should be half the price they are for what you get. I also got tired of looking at the holes I had to put in the rubber dust boots which go from the mirror to the side to the upper fairings to use these mounts. Expect to drop $25 for replacement rubber. If I knew what I know now, I would not have bought them.


These mounts are the BLM mounts and are a far superior product both from a stability perspective and a construction perspective. They are available from here: http://www.spoiledbiker.com/st1300.html


It just depends where you want to mount whatever. Also at the same site check out the under the mirror mounts they have as they are of excellent quality and construction but made by Dick Seng Brackets.


They can also sell you some really strong lower fork mounts for lights as well which are make by BLM. (Shown at the bottom left.)

~~~
Thank You again for your contribution John Herring, aka JohnnyRide
Original article can be found here: Hella FF50 Driving Spotlights
~~~
Hella FF50 Driving SpotLights ( ST1300 )
You will want to install a dedicated power harness w/relay along with this setup to protect the factory relays and wiring of your investment. Do it, don't ask why. To connect your new spotlights see this Gadget page as there isn't much point in me rewriting anything on that. Adaptable relay harnesses are always available from sources such as Pepboys®, Walmart® and, Autozone®, to name a few. Usually around $20.
I found a set of Hella FF50 driving lights and installed them high on the engine guards on my former bike. They are black plastic, oval in appearance and are H7 bulb based. These suckers kick butt and illuminate the hell out of the road ahead. There is no way you could drive around at night with on coming traffic. They would be leaning out their windows trying to shoot the lights out. Way bright. But for lonely back road night driving, they do an outstanding job. Got them off EBAY for $35. The normal price is $70-$80 for the pair.
This is an accurate representation of the output.
Use the wiring diagram link above as your guide to connect these night burners.
TurboCity under the mirror mounting system
Finished product, to the left, looks like it might sting you or something.
Side shot.... excuse the fingerprints and dirt.
Wires are ready for soldering, heat shrinking the joints and pulling the runs though the mounts from TurboCity. Nice and clean looking.
I always reverse the connectors so it is impossible to plug them together the wrong way.
I sure hope I remember what I did today.... Thank goodness the fairing hides this stuff. The Stebel 139db air horn is there and it relayed circuit as well as the Hella relay and associated wiring.
LOL... long day but it was worth it... You can see my laptop to the left so I could hit the ST Forum if I got stuck on something.
As a foot note to the TurboCity under the mirror brackets, I will say this, I took them off. I don't like the way they mount or look. There is a good degree of vibration passed to the lights during motion. They should be half the price they are for what you get. I also got tired of looking at the holes I had to put in the rubber dust boots which go from the mirror to the side to the upper fairings to use these mounts. Expect to drop $25 for replacement rubber. If I knew what I know now, I would not have bought them.
These mounts are the BLM mounts and are a far superior product both from a stability perspective and a construction perspective. They are available from here: http://www.spoiledbiker.com/st1300.html
It just depends where you want to mount whatever. Also at the same site check out the under the mirror mounts they have as they are of excellent quality and construction but made by Dick Seng Brackets.
They can also sell you some really strong lower fork mounts for lights as well which are make by BLM. (Shown at the bottom left.)
~~~
Thank You again for your contribution John Herring, aka JohnnyRide
#59
ST1300 Archive of Wisdom / PIAA 1100 X Driving Lights ( S...
Last post by KoTAOW - April 09, 2012, 04:43:13 PMSubmitted by John Herring, aka JohnnyRide
Original article can be found here: PIAA 1100 X Driving Lights
~~~

You will want to install a dedicated power harness w/relay along with this setup to protect the factory relays and wiring of your investment. The PIAAs come with everything you need including a harness and relay with other connectors as well but if you picked up a used pair without any other parts then see this Gadget page as there isn't much point in me rewriting anything on that. Adaptable relay harnesses are always available from sources such as Pepboys®, Walmart® and, Autozone®, to name a few. Usually around $20.
These are the PIAA 1100 X PLATINUM that you hear so much about and most people rave about. Hummmp. Whatever. The the money I paid so these I really can't say they are great but, they aren't bad either. I think it is important to manage ones expectations about these and in this case, mine. Now keep in mind these replaced my Hella FF50s which are hands down night burning monsters which I do rave about. However, a lot of light isn't a good thing. Too much light can actually cut down you night vision from the bright illumination in front of you and therefore decreasing your night time off road vision or peripheral night vision if you will. While your pupils are growing smaller to regulate the stream of light in front of you, you will actually see less to the sides, like that deer running 30 MPH at your 9:00 towards the road.

Available In: Super White Driving
Bulb Type: 12V - Dichroic 55watt=85watt Super White
Features: Silver PPS housing and chrome plated aluminum trim ring
Kit Includes: Two lamps, wiring harness, relay, and switch

Now having said I wasn't knocked out about these I will try to relay what I do like.
I am not really sure what I expected but I think I equated the dollar amount with a perceived high amount of light output somehow refined into a pleasing flow of light resembling the sun at high noon. That isn't what these are about.
Since these light have a 35 degree Dichroic output pattern, (like the Silver Bullet lights that have the MR-16 bulbs), they project in a round pattern so you get a larger pool of light on the road compared with the driving light blast of the long range, down the road Hellas®. This makes the PIAAs much better suited to roads with curves and hills as the larger light pool is not reproducible with the Hellas®. On the highway they fan out to gently light a broad area to the sides. This is particularly affective in REBR, or rodent eyeball reflection, at speed. The 70/65w Osram® bulbs in the headlight assembly are the main light source on the bike and are strong in their own right. The PIAAs help to supplement those lights rather than over power them. The Osram® bulbs punch light out and are not coated with any blue tint which is marketed as being popular these days. The PIAAs are coated to an extent and that is apparent when all lights are engaged. Used in unison with the high beam, these seem to be acceptable in performance. I guess it is best to say that running the PIAAs, with the high beams, creates and even larger high beam. Not in output, so to speak, but in the size of the pattern. I have them wired to come on with the high beams only as per state law. I do not use these as day time running lights but I can see why so many people use them in that mode as well. A front view of the lights is painful head on. They would not be suited to night time driving in traffic and that's ok because I have my Whellen® TIR3 lights mounted on the sides of the front fender for that purpose. Obviously I didn't dislike these enough to return them. Once I got over the initial shock of, Hey!!! these don't emulate the sun!!! and managed my expectations they seem fine.
Hazard Flash Mode Video here.
I did not use the supplied harness or relay which comes with the kit. I cut the wires and added the crimp on connectors like I did the Hellas.
I mounted these directly to the under side of the mirror covers. They looked like warts on the bike when I used the BLM mounts and I just really don't like the under the mirror mounts from Turbo City. I drilled a hole under the mirrors and with the doubled sided tape supplied with the mounting bases for additional support, added a bolt into the equation and tightened them down. They don't have enough weight to pop the mirrors off when you hit a good sided bump in the road.
All in all they are not bad for what they are but PIAA should offer a lamp only option to reduce the cost for those of us who make their own harnesses and have extra relays sitting around. EBAY was the best price at $153 that I saw.
~~~
UPDATE: I sold the PIAAs as they just didn't perform like I wanted. It hard to explain but I think of they were more of a spot instead of a flood, I would have been happier.
~~~
Thank You again for your contribution John Herring, aka JohnnyRide
Original article can be found here: PIAA 1100 X Driving Lights
~~~
PIAA 1100 X Driving Lights ( ST1300 )
You will want to install a dedicated power harness w/relay along with this setup to protect the factory relays and wiring of your investment. The PIAAs come with everything you need including a harness and relay with other connectors as well but if you picked up a used pair without any other parts then see this Gadget page as there isn't much point in me rewriting anything on that. Adaptable relay harnesses are always available from sources such as Pepboys®, Walmart® and, Autozone®, to name a few. Usually around $20.
These are the PIAA 1100 X PLATINUM that you hear so much about and most people rave about. Hummmp. Whatever. The the money I paid so these I really can't say they are great but, they aren't bad either. I think it is important to manage ones expectations about these and in this case, mine. Now keep in mind these replaced my Hella FF50s which are hands down night burning monsters which I do rave about. However, a lot of light isn't a good thing. Too much light can actually cut down you night vision from the bright illumination in front of you and therefore decreasing your night time off road vision or peripheral night vision if you will. While your pupils are growing smaller to regulate the stream of light in front of you, you will actually see less to the sides, like that deer running 30 MPH at your 9:00 towards the road.
Available In: Super White Driving
Bulb Type: 12V - Dichroic 55watt=85watt Super White
Features: Silver PPS housing and chrome plated aluminum trim ring
Kit Includes: Two lamps, wiring harness, relay, and switch
Now having said I wasn't knocked out about these I will try to relay what I do like.
I am not really sure what I expected but I think I equated the dollar amount with a perceived high amount of light output somehow refined into a pleasing flow of light resembling the sun at high noon. That isn't what these are about.
Since these light have a 35 degree Dichroic output pattern, (like the Silver Bullet lights that have the MR-16 bulbs), they project in a round pattern so you get a larger pool of light on the road compared with the driving light blast of the long range, down the road Hellas®. This makes the PIAAs much better suited to roads with curves and hills as the larger light pool is not reproducible with the Hellas®. On the highway they fan out to gently light a broad area to the sides. This is particularly affective in REBR, or rodent eyeball reflection, at speed. The 70/65w Osram® bulbs in the headlight assembly are the main light source on the bike and are strong in their own right. The PIAAs help to supplement those lights rather than over power them. The Osram® bulbs punch light out and are not coated with any blue tint which is marketed as being popular these days. The PIAAs are coated to an extent and that is apparent when all lights are engaged. Used in unison with the high beam, these seem to be acceptable in performance. I guess it is best to say that running the PIAAs, with the high beams, creates and even larger high beam. Not in output, so to speak, but in the size of the pattern. I have them wired to come on with the high beams only as per state law. I do not use these as day time running lights but I can see why so many people use them in that mode as well. A front view of the lights is painful head on. They would not be suited to night time driving in traffic and that's ok because I have my Whellen® TIR3 lights mounted on the sides of the front fender for that purpose. Obviously I didn't dislike these enough to return them. Once I got over the initial shock of, Hey!!! these don't emulate the sun!!! and managed my expectations they seem fine.
Hazard Flash Mode Video here.
I did not use the supplied harness or relay which comes with the kit. I cut the wires and added the crimp on connectors like I did the Hellas.
I mounted these directly to the under side of the mirror covers. They looked like warts on the bike when I used the BLM mounts and I just really don't like the under the mirror mounts from Turbo City. I drilled a hole under the mirrors and with the doubled sided tape supplied with the mounting bases for additional support, added a bolt into the equation and tightened them down. They don't have enough weight to pop the mirrors off when you hit a good sided bump in the road.
All in all they are not bad for what they are but PIAA should offer a lamp only option to reduce the cost for those of us who make their own harnesses and have extra relays sitting around. EBAY was the best price at $153 that I saw.
~~~
UPDATE: I sold the PIAAs as they just didn't perform like I wanted. It hard to explain but I think of they were more of a spot instead of a flood, I would have been happier.
~~~
Thank You again for your contribution John Herring, aka JohnnyRide
#60
ST1300 Archive of Wisdom / HID Conversion - VVME Kit ( ST...
Last post by KoTAOW - April 09, 2012, 04:18:40 PMSubmitted by John Herring, aka JohnnyRide
Original article can be found here: HID Conversion
~~~

If you want to revolutionize the lighting on your bike, you have to do this. There is a site out there named VVME.com who sells inexpensive HID conversion kits for under $100 which contains 2 HI/LOW bulbs, 2 ballasts with igniters and the rest of the wiring harnesses required to put off the conversion. Included in that is the controller for the bulbs which cause the high/low effect. When ordering you have to pay attention to the ballast size, as there are 2 sizes, I went with the smaller ones.
You also need to watch the type of bulb as there are 2 types of high low bulbs. One has 2 bulbs, the HID "bulb" and a smaller, non HID bulb which is suppose to act as a high beam. I found found this type setup to be substandard for quality lighting.
The other type of bulb is the Bi-Luxon version which just has the HID bulb but it has a sliding reflector system around the bulb that redirects the light to the High Beam portion of the housing when you flick over to high beam. When you kick these up on high, it is nothing less than amazing, a panoramic blast of brilliant white light, 4300K is what I bought on the color side, which, I swear is 45 degrees in spread. What this means is that a tremendous amount of light also hits the road and on both sides of the road are illuminated striking as such. Wildlife can not hide, there is just no way. With that kind of spread, it is a bit harder to out run the headlights in a curve. Well assuming there isn't oncoming traffic, because they would go off in a ditch somewhere from the Eyes of God blasting away the darkness. And, we don't want that. Thank God we have that 7 position adjustment knob on the dash as well as the fine tuning adjustment on the bottom side of the headlight motor.
I was a bit pessimistic about ordering form a company located in China but I am going to rate this customer service group on a scale of 1 to 10 with a 15. Yep, they are off the chart. I had a hick-up with my credit card and got billed for 4 transactions. At $108 per instance this wasn't cheap and I was thinking, crap, China?!?!? I'll never get my money back, I am screwed. Nope, not the case, I spoke with Owen, their Sales Manager in China, and we got everything worked out, and my refunds secured. What a guy!! I was happy, relieved and impressed.
After the install, I ought, you know, I ought to go ahead and order a spares kit so to speak in case the design changes and I can't get the same thing again. I ordered the replacement and due to me getting in a hurry, I ordered the wrong bulb kit. (They one that you don't want to order that is not the all-in-one bulb. I get the kit, open it, crap, wrong one. Doh!! So, I figure I'll keep the 2 ballasts and igniters and scrap the bulbs and just order one more bulb. I just didn't want to deal with shipping back to China. So I order one bulb, was charged for one bulb and what do you think I received???? I think Owen saw what I did and figured out what was going on because I received, 2 bulbs and also a complete wiring harness that includes the Light Controller Unit for the price of 1 bulb. EXCELLENT!!!!
So that is why they rate a 15 on a 1-10 scale, excellence in customer service and proactive thinking.

Digital Slim H4-3(9003) Bi-Xenon HID Kit
Starting at: $112.99
Save: 23% off $86.99
Digital Ultra Slim H4-3(9003) Bi-Xenon (Dual Beam) HID conversion kit. This is a genuine xenon HID kit that is E4 & ISO-9001:2000 Approved, NOT those cheap ones that do nothing at all. It can give you both Hi/Low in Xenon HID.
The kit comes complete with a relay harness, and it is Plug-n-Play and easy to install (30-40 min. for a beginner) for your specific vehicle applications and fit directly into your existing headlight assembly. All necessary hardware for installation is included. These kits come with solid metal Waterproof/Weatherproof ballast.
(Installation Demo) (Installation Videos)
Don't be fooled by other sellers who copy our site content and sell cheap "knock-off" HID products that stop working after several months of usage. Our HID kits come with One Year Warranty directly with our factory.
When you add to cart, you can select which color you want.
Available Colors: 4300K, 5000K, 6000K, 8000K, 10000K and 12000K
Special Colors: 3000K, 15000K is $12 more expensive
Probably the most cumbersome chore is figuring out where you are going to mount this stuff. I went under the front cowl like most people do. They offer a smaller digital ballast and that is the version I bought. They are the 2 silver looking squares which are shown in the pictures. As you notice they do have milled mounting tabs as part of the ballast casing.


There is a considerable amount of wiring harness to hid since it was really designed for an automobile. However, It is possible for all of it to live in the cowling area. I guess I could have cut it down to size, but it fit so why mess with it. Some find it easier to take off all the fairing plastic to do this but I basically just released the nose cone of the bike and tilted it downward to gain access.

Here is the right driver side bulb installed. You will have to cut the opening of the dust boot wider so that the bulb can fit though it. No other mods to the lighting area are required or needed. The bulb is actually a 2-piece bulb, it will make sense when you see it. You put in the H4 frame of the bulb, put the pain in the butt bulb retention spring back down, slip on the boot cover then the actual bulb portion of this assemble slides in the hold and click locks with a quarter clockwise turn.

Just a picture of the HID bulb installed into the reflector. As you can see it is a bit different looking than a standard H4 bulb

The thing about HID lights is that when they "startup", they don't like to be interrupted in that process nor do they like to be turned off and right back on for that matter. I guess technically this might be called, "hot re-strike time", for lack of term. So when you turn the key on and the lights come on and then hit the start button, the headlights are cut off so the battery doesn't bare the load of the lights while trying to start the engine. Stock lights do this and so do the HID'S.

You will need to retrain yourself on how to start the bike otherwise you might have one light fail to start or both. No damage occurs to the HID, you just have to restart them if this occurs.
What you want to do is either wire yourself up a switch controlling a relay you can flip on after you start the bike or, flip the RUN switch on, on the right handle bar, press and hold the STARTER BUTTON and then turn the key on. That way the lights don't start until after the bike does.
~~~
Thank You again for your contribution John Herring, aka JohnnyRide
Original article can be found here: HID Conversion
~~~
HID Conversion - VVME Kit ( ST1300 )
If you want to revolutionize the lighting on your bike, you have to do this. There is a site out there named VVME.com who sells inexpensive HID conversion kits for under $100 which contains 2 HI/LOW bulbs, 2 ballasts with igniters and the rest of the wiring harnesses required to put off the conversion. Included in that is the controller for the bulbs which cause the high/low effect. When ordering you have to pay attention to the ballast size, as there are 2 sizes, I went with the smaller ones.
You also need to watch the type of bulb as there are 2 types of high low bulbs. One has 2 bulbs, the HID "bulb" and a smaller, non HID bulb which is suppose to act as a high beam. I found found this type setup to be substandard for quality lighting.
The other type of bulb is the Bi-Luxon version which just has the HID bulb but it has a sliding reflector system around the bulb that redirects the light to the High Beam portion of the housing when you flick over to high beam. When you kick these up on high, it is nothing less than amazing, a panoramic blast of brilliant white light, 4300K is what I bought on the color side, which, I swear is 45 degrees in spread. What this means is that a tremendous amount of light also hits the road and on both sides of the road are illuminated striking as such. Wildlife can not hide, there is just no way. With that kind of spread, it is a bit harder to out run the headlights in a curve. Well assuming there isn't oncoming traffic, because they would go off in a ditch somewhere from the Eyes of God blasting away the darkness. And, we don't want that. Thank God we have that 7 position adjustment knob on the dash as well as the fine tuning adjustment on the bottom side of the headlight motor.
I was a bit pessimistic about ordering form a company located in China but I am going to rate this customer service group on a scale of 1 to 10 with a 15. Yep, they are off the chart. I had a hick-up with my credit card and got billed for 4 transactions. At $108 per instance this wasn't cheap and I was thinking, crap, China?!?!? I'll never get my money back, I am screwed. Nope, not the case, I spoke with Owen, their Sales Manager in China, and we got everything worked out, and my refunds secured. What a guy!! I was happy, relieved and impressed.
After the install, I ought, you know, I ought to go ahead and order a spares kit so to speak in case the design changes and I can't get the same thing again. I ordered the replacement and due to me getting in a hurry, I ordered the wrong bulb kit. (They one that you don't want to order that is not the all-in-one bulb. I get the kit, open it, crap, wrong one. Doh!! So, I figure I'll keep the 2 ballasts and igniters and scrap the bulbs and just order one more bulb. I just didn't want to deal with shipping back to China. So I order one bulb, was charged for one bulb and what do you think I received???? I think Owen saw what I did and figured out what was going on because I received, 2 bulbs and also a complete wiring harness that includes the Light Controller Unit for the price of 1 bulb. EXCELLENT!!!!
So that is why they rate a 15 on a 1-10 scale, excellence in customer service and proactive thinking.
Digital Slim H4-3(9003) Bi-Xenon HID Kit
Starting at: $112.99
Save: 23% off $86.99
Digital Ultra Slim H4-3(9003) Bi-Xenon (Dual Beam) HID conversion kit. This is a genuine xenon HID kit that is E4 & ISO-9001:2000 Approved, NOT those cheap ones that do nothing at all. It can give you both Hi/Low in Xenon HID.
The kit comes complete with a relay harness, and it is Plug-n-Play and easy to install (30-40 min. for a beginner) for your specific vehicle applications and fit directly into your existing headlight assembly. All necessary hardware for installation is included. These kits come with solid metal Waterproof/Weatherproof ballast.
(Installation Demo) (Installation Videos)
Don't be fooled by other sellers who copy our site content and sell cheap "knock-off" HID products that stop working after several months of usage. Our HID kits come with One Year Warranty directly with our factory.
When you add to cart, you can select which color you want.
Available Colors: 4300K, 5000K, 6000K, 8000K, 10000K and 12000K
Special Colors: 3000K, 15000K is $12 more expensive
Probably the most cumbersome chore is figuring out where you are going to mount this stuff. I went under the front cowl like most people do. They offer a smaller digital ballast and that is the version I bought. They are the 2 silver looking squares which are shown in the pictures. As you notice they do have milled mounting tabs as part of the ballast casing.
There is a considerable amount of wiring harness to hid since it was really designed for an automobile. However, It is possible for all of it to live in the cowling area. I guess I could have cut it down to size, but it fit so why mess with it. Some find it easier to take off all the fairing plastic to do this but I basically just released the nose cone of the bike and tilted it downward to gain access.
Here is the right driver side bulb installed. You will have to cut the opening of the dust boot wider so that the bulb can fit though it. No other mods to the lighting area are required or needed. The bulb is actually a 2-piece bulb, it will make sense when you see it. You put in the H4 frame of the bulb, put the pain in the butt bulb retention spring back down, slip on the boot cover then the actual bulb portion of this assemble slides in the hold and click locks with a quarter clockwise turn.
Just a picture of the HID bulb installed into the reflector. As you can see it is a bit different looking than a standard H4 bulb
The thing about HID lights is that when they "startup", they don't like to be interrupted in that process nor do they like to be turned off and right back on for that matter. I guess technically this might be called, "hot re-strike time", for lack of term. So when you turn the key on and the lights come on and then hit the start button, the headlights are cut off so the battery doesn't bare the load of the lights while trying to start the engine. Stock lights do this and so do the HID'S.
You will need to retrain yourself on how to start the bike otherwise you might have one light fail to start or both. No damage occurs to the HID, you just have to restart them if this occurs.
What you want to do is either wire yourself up a switch controlling a relay you can flip on after you start the bike or, flip the RUN switch on, on the right handle bar, press and hold the STARTER BUTTON and then turn the key on. That way the lights don't start until after the bike does.
~~~
Thank You again for your contribution John Herring, aka JohnnyRide